GeForce 9650m GT on X57Vn, M50Vn, N80Vn
I am wirting this post in regards to an issue that has been plaguing the nVidia GeForce 9650m GT on a number of ASUS laptops, namely the X57Vn, M50Vn, N80Vn, and possibly more.The issue is associated with constant driver crashes
EG.:
Display Driver Stopped Responding and Has Recovered
on all nVidia drivers after 179.48. Aside from the driver crash, the display panel (screen) shows random multicolored lines and pixel, as if the panel has dead pixels. It actually looks pretty much like bad TV reception, except it's in RGB pixels. No, the problem is not your panel, read further.


The problem in this case has been solved already - If you have a X57Vn, M50Vn or N80Vn you can download the modified file here: M50VAS.209.rar
I have experienced these problems on my X57Vn under Windows7 64bit and the only solution to get hardware acceleration was to install 179.48 from the nVidia site. The drivers provided by ASUS did not do any good. Any later nVidia driver didn't too.
One solution seems to be to disable PowerMizer - that's nVidia's power saving feature. The people at the nVidia forums made a batch file to edit the registry and correct the values.
I haven't tried that solution though because I found out this:
The real issue with the 9650m GT on the mentioned platforms is a slight undervolting of the GPU core.
再會亦有期 at the laptopvideo2go.com forums discovered that and he modded a BIOS for the platforms mentioned before.
The undervoltage is just by 0.01V - instead of 0.9V the voltage is set to 0.89V. Using the following procedure you can check if your BIOS is affected.
On the X57Vn, M50Vn and N80Vn the GPU BIOS is embedded into the system BIOS, so in order to modify the GPU BIOS it has to be extracted first, then modified and imported back into the main BIOS. Using MMtool you can follow the process illustrated here.
It basically goes so:
1. Download the latest BIOS from the ASUS Site. As of writing, this is 209. (M50V209AS.zip)
2. Extract the BIOS and open with MMTool.
3. Go to the Extract tab, scroll though the entries until you find a matching VendorID and DeviceID.

These can be found under the Hardware tab on the Display Adapter properties in the Device Manager:

4. After you extract the files, open NiBiTOR and load the freshly extracted GPU BIOS.
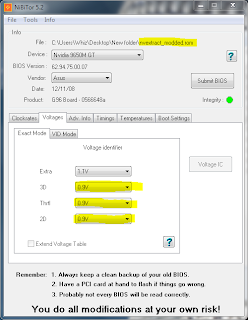
Under the Voltages Tab it should look like this:

The 0.89V core voltage is the thing that is causing problems.
A GPU BIOS Extracted from the modified bios that 再會亦有期 made shows the correct voltages: 0.9V

You should then proceed to flash the BIOS, by either using WinFlash (Asus tool for windows) or the EasyFlash in BIOS.
In case you have installed 209 already, you have to use EasyFlash, since WinFlash will say that the version is not newer and will exit.
This solved the issues for me, and I am running the latest nVidia Driver (195.39 as of time of writing) with no problems so far!
Many thanks to 再會亦有期 for his work, i don't claim to take any credit for this modification.
Please vist the original thread for other updates!
I hope this solved your problems because this has really put a peg in my cogs for a while! =)
0 comments :
Post a Comment